Frequently Asked Questions & Solutions
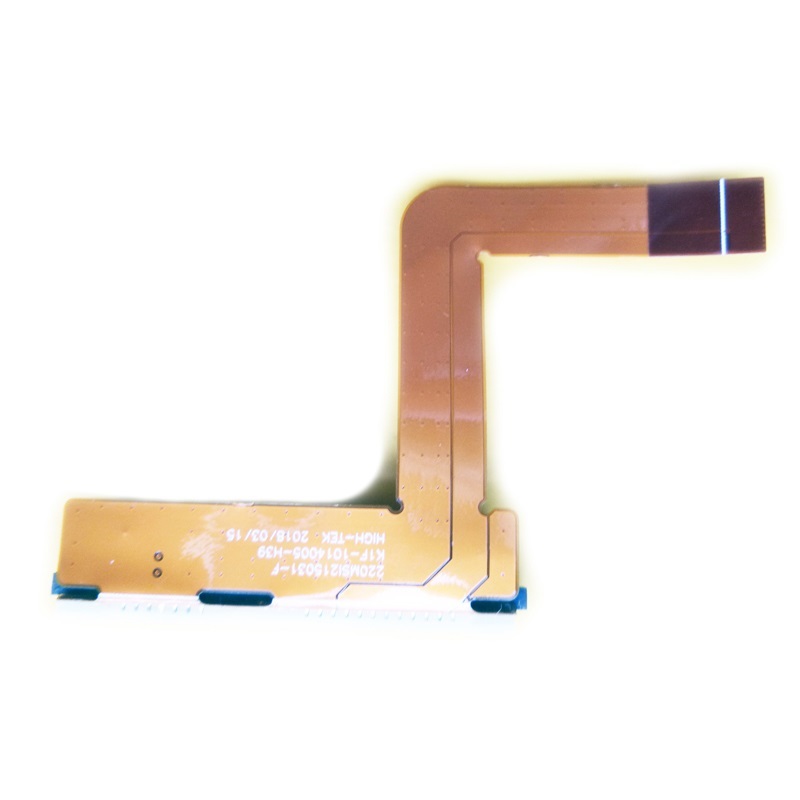
What are the connector type, length, and pin count of this cable?
Ensure these specifications match your original cable – the connector must fit both the hard drive and the motherboard header, the length should allow proper routing without tension, and the pin count determines the data/voltage signals. Most laptop hard drive cables use a 7+15 pin SATA combo connector on the drive side and a proprietary FFC connector on the motherboard side.
Is this cable compatible with my laptop model?
This cable is designed for GS73. However, hard drive cables are often model‑specific due to different motherboard connectors, cable lengths, and routing paths. Please compare the physical shape and connector pinout with your original cable. Check the part number printed on the cable (if available) – it should match or be an official alternative. Using an incompatible cable may result in detection failure, slow data transfer, or even damage to the drive.
How to replace the hard drive cable step by step?
- Safety first: Disconnect the main battery and AC power to avoid any short circuits.
- Remove the bottom cover (D‑cover) to access the internal components.
- Locate the hard drive – it is usually mounted in a dedicated bay, secured by screws or a caddy. The hard drive cable connects from the drive to the motherboard.
- Disconnect the cable from the hard drive – gently pull the connector straight out. Do not rock it sideways to avoid bending pins.
- Disconnect the cable from the motherboard – find the motherboard header, which is often labelled HDD, SATA, or JHDD. If it is a ZIF (Zero Insertion Force) connector, flip up the locking tab, then slide the cable out. If it is a standard plug, gently pull it off.
- Remove the old cable – it may be routed along chassis grooves and secured with adhesive tape. Carefully free it without tearing the cable.
- Install the new cable – route it exactly along the same path as the original, using the adhesive tape or clips to hold it in place. Ensure there is no excessive bending or pinching.
- Connect the motherboard end first – insert the cable fully into the header (with correct orientation – gold contacts facing the locking tab for ZIF) and secure the locking tab.
- Connect the drive end – plug it into the hard drive’s SATA combo port (data + power). The connector is keyed – it will only fit one way.
- Secure the hard drive back into its bay with screws.
- Test before reassembly – reconnect the battery briefly, power on the laptop, enter BIOS or boot into the operating system and check if the drive is detected and functions normally.
- Power off, disconnect the battery again, and reassemble the bottom cover.
Note: The cable is delicate – avoid sharp folds or pulling on the wires. Always hold the connector, not the cable itself.
Where is the hard drive cable located inside the laptop, and how is it routed?
The hard drive cable typically runs between the
hard drive bay and the
motherboard. Its exact path depends on the laptop design:
- In most 15‑inch and larger laptops, the hard drive is placed on one side of the palmrest, and the motherboard header is located nearby, so the cable is short and direct.
- In thinner or smaller models, the drive may be positioned under the touchpad or near the hinge, while the motherboard header is further away – the cable then runs along the chassis edge, often secured with tape or clips.
- Some models route the cable under the keyboard or through a dedicated channel in the middle frame.
The cable must be routed carefully to avoid contact with heat sinks, fans, or moving parts. It is usually secured with adhesive tape or plastic clamps to prevent it from coming loose during normal use.
To access the cable, you generally need to remove the bottom cover only, but on some machines you may also need to remove the hard drive caddy or the entire drive assembly first.
How do I identify the motherboard header and connect the cable correctly?
The motherboard header for the hard drive cable is usually labelled with a silk‑screen marking such as:
- HDD / HDD1
- SATA / SATA0 / JP1
- JHDD or PRI_IDE (on older models)
Connection steps:
- If the motherboard connector is a ZIF type (common for FFC cables), lift the small retaining flap, insert the cable with the exposed copper contacts facing the flap, then press the flap down to lock.
- If it is a standard pin header, the cable will have a matching socket – simply align the key (notch) and press firmly until it seats fully.
- Ensure the cable is not twisted – the correct orientation is usually indicated by a coloured stripe (often blue or red) on one edge of the cable, which should align with the “pin 1” indicator on the header (a small triangle or dot).
- Do not use excessive force – if the cable does not go in easily, check the orientation and alignment.
After connecting, gently tug on the cable to verify it is securely locked in place.
What precautions should I take, and what if the drive is not detected after replacement?
Critical precautions:
- Always disconnect the battery before handling the cable – a short circuit can damage the SATA controller or the hard drive itself.
- Handle the FFC with care – it is fragile. Avoid creasing, folding, or pulling on the cable. Always hold the connector ends.
- Ensure correct orientation – inserting the cable upside‑down or off‑set can bend pins or cause a short.
- Check for cable pinch points – when reassembling, make sure the cable is not trapped between the chassis and the bottom cover, as this can cause intermittent connection or permanent damage.
- Use anti‑static precautions – ground yourself before touching the cable or connectors to avoid ESD damage.
Troubleshooting if the hard drive is not detected:
- Re‑seat both ends – disconnect and reconnect the cable at the drive and the motherboard.
- Check the cable for visible damage – look for tears, kinks, or broken traces.
- Test with another drive – if possible, connect a known‑good drive to determine if the issue is the cable or the drive.
- Check BIOS/UEFI – enter the system setup and see if the drive appears in the storage list. If not, the cable may be faulty or improperly connected.
- Inspect the motherboard header – look for bent or broken pins. If damaged, the header may need professional repair.
- Verify the drive’s power and data signals – some cables combine both in one connector; ensure the power pins are not bent.
- If using a SATA cable with separate power and data – confirm both are connected correctly.
If the problem persists, the new cable might be incompatible or defective – contact our support with your laptop model and original cable part number.
How can I tell if my hard drive cable is faulty?
Common symptoms of a failing hard drive cable include:
- Intermittent drive detection – the drive appears and disappears randomly.
- Slow data transfer or file corruption – frequent errors when copying files or booting.
- Clicking or unusual noises from the hard drive (though this could also be drive failure).
- Physical damage – visible cuts, kinks, or broken connector clips.
If you suspect a cable issue, the most reliable test is to replace it with a known‑good cable. Our replacement cable is manufactured to OEM specifications and is the best solution to restore stable connectivity.