Frequently Asked Questions & Solutions
Is this a CPU fan or a GPU fan?
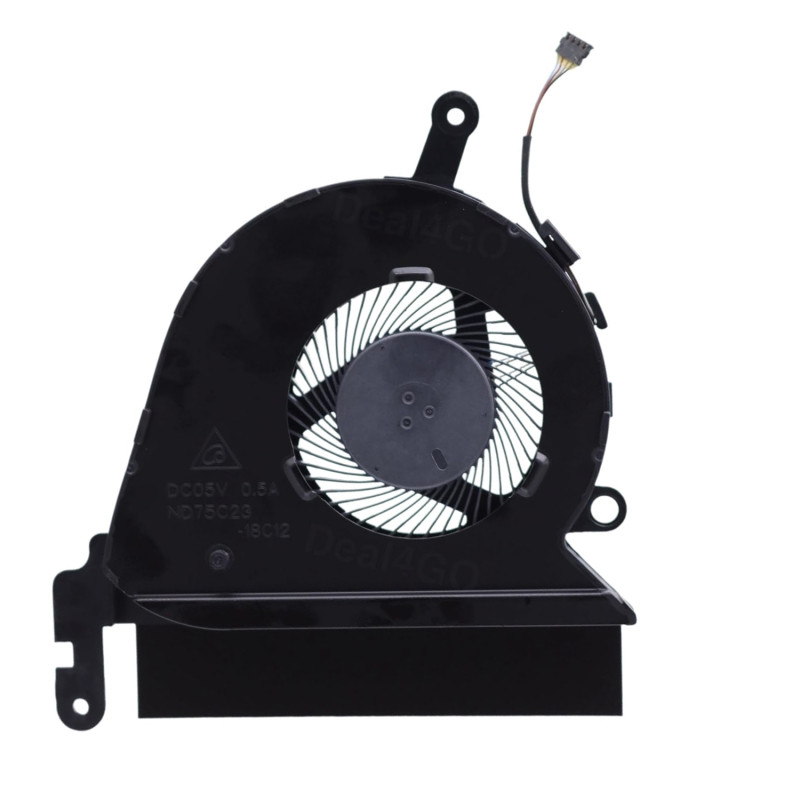
This fan is identified as a
CPU fan.
Why this matters:
- CPU fans are typically larger and sit on top of the processor, often with a dedicated heatsink and heatpipe.
- GPU fans are usually smaller and cool the graphics chip – they may have a separate heatsink or share a heatpipe system with the CPU.
- Combined units cover both CPU and GPU with a shared heatpipe system – these are common in gaming laptops.
- Installing the wrong type may result in poor cooling performance or the fan not fitting in the chassis.
How to verify: Open your laptop and look at the fan location – CPU fans are usually near the centre/top of the motherboard, while GPU fans are near the graphics chip (often on the right side). Check the part number on your original fan – it often indicates CPU or GPU designation (e.g., "CPU_FAN" or "GPU_FAN").
If you are unsure, send us a photo of your original fan and we can confirm the type for you.
What are the power and connector specifications of this fan?
Power:
DC 5V 0.5A | Connector:
4 wires 4 pins.
Important considerations:
- Most laptop fans operate at 5V DC (some older models use 3.3V or 12V). Using a fan with the wrong voltage can damage the motherboard or cause the fan not to spin.
- The connector type is critical – common types include:
- 2‑pin: Basic power and ground – speed is fixed (no PWM control).
- 3‑pin: Power, ground, and tachometer (RPM feedback) – speed is controlled by voltage regulation.
- 4‑pin: Power, ground, tachometer, and PWM (Pulse Width Modulation) – offers precise speed control and is the most common in modern laptops.
- Using a fan with a different pin count may require an adapter or may not work at all – check your motherboard header (usually labelled CPU_FAN, FAN1, or J_FAN).
- The power rating (in watts) indicates the fan's energy consumption – a fan with higher power may draw more current than your motherboard can supply.
If any specification is not shown, refer to the product pictures or contact our support.
What should I check regarding the physical appearance and dimensions?
Pay close attention to the following physical attributes:
- Measure the width, height, and thickness of your original fan. Even a 1‑2mm difference can prevent the fan from fitting in the chassis.
- Mounting clips and screw hole positions: The clips and screw holes must align with your laptop's chassis. There are typically 2‑4 screw holes or clips on the fan assembly.
- Overall shape: Compare the side profile and contour of the fan housing – some fans have a specific curve to fit around other components (e.g., RAM slots, battery).
- Heatsink integration: If your fan has an attached heatsink, check the heatpipe layout and the contact surface for the CPU/GPU – it must match the die size and position.
- Airflow direction: The fan should blow air outward through the vents – check the blade orientation if you are unsure.
- Fan blade count and design: While not critical for fit, a different blade design may affect noise and airflow characteristics.
Best practice: Place your original fan next to the product photos and compare every detail – screw hole locations, clip positions, and the shape of the fan housing. If you are unsure, measure your original fan with a ruler and share the dimensions with us.
Does this fan come with a heatsink assembly?
No, this is a standalone fan only – it does not include a heatsink assembly.
What this means for you:
- You will need to transfer your existing heatsink (metal fins and heatpipes) from the old fan to the new one.
- Ensure the screw holes and mounting points on the new fan match your existing heatsink – different fans may have different attachment mechanisms.
- If your heatsink is damaged or worn, we recommend purchasing a combined unit (fan + heatsink) instead.
Important: When transferring the heatsink, clean the thermal paste from both the heatsink and CPU/GPU surfaces, and apply fresh thermal paste before reassembly.
If you are unsure, send us a photo of your original assembly – we can confirm if this fan is compatible with your heatsink.
How can I confirm compatibility using the model/part number?
The model number (PN) of this fan is
L41483-001.
How to verify compatibility:
- Check the PN printed on your original fan – it is usually on a sticker on the fan housing (e.g., "MCF‑MP‑xxxx", "DA0FANxxx").
- If the PN matches or is listed as compatible on our product page, it is a direct replacement.
- If the PN differs, it may still be compatible – compare the physical attributes (size, screw holes, connector) and cross‑reference with the laptop models listed.
- Our products are guaranteed to be compatible with the laptop models we list – even if the PN is different, we have verified the fit.
Pro tip: Some laptop manufacturers use multiple fan suppliers – Dell, HP, and Lenovo often use different fan PNs for the same model. If your original fan has a different PN, it may still be a functional replacement. When in doubt, send us a photo of your original fan's PN sticker along with your laptop model, and we will confirm compatibility.
Where is the fan physically located inside the laptop?
The fan is located inside the
base chassis (under the D Cover) and is part of the laptop's
thermal management system. Its exact position depends on the laptop model:
- CPU fan: Usually positioned near the centre or top‑left of the motherboard, close to the processor. It draws heat from the CPU via a heatsink and exhausts it through the rear or side vents.
- GPU fan: Often located on the right side of the motherboard (in gaming laptops) or near the graphics chip.
- Combined units: Centrally located with heatpipes extending to both CPU and GPU, exhausting through the rear vents.
- The fan is secured to the motherboard or chassis with small screws (usually 2‑4) and has a cable that plugs into a dedicated fan header on the motherboard.
Accessing the fan requires removing the bottom cover (D Cover) and sometimes the heatsink assembly (if the fan is attached to it). Some models require removing the motherboard to access the fan from the underside.
Always consult your laptop's service manual for model‑specific disassembly instructions.
How do I identify the motherboard fan header and connect the cable?
The fan cable plugs into a dedicated header on the motherboard. It is usually clearly labelled and located near the CPU or GPU area. Common markings include:
- CPU_FAN / CPU_FAN1 – for CPU cooling fans.
- FAN1 / FAN2 / SYS_FAN – for general system fans.
- J_FAN / JP_FAN – generic fan header labels.
- GPU_FAN – on some models with separate GPU cooling.
Connection steps:
- Align the connector with the header – it is keyed (usually with a small tab) so it only fits one way.
- Push the connector in gently until it clicks or seats fully.
- Do not force the connector – if it does not go in easily, check the orientation and ensure no bent pins.
- For 4‑pin PWM fans, the speed is controlled by the motherboard; for 3‑pin fans, speed is controlled by voltage regulation.
Important: If you are replacing a 4‑pin fan with a 3‑pin fan (or vice versa), the system may still work but speed control may differ. The motherboard will typically run a 3‑pin fan at full speed if it expects a PWM signal.
If your connector has the same number of pins but the plug shape looks different, some manufacturers use proprietary connectors – in rare cases, you may need to repin or use an adapter.
How to replace the fan cooler step by step?
Note: Fan replacement involves handling thermal paste and delicate components. Follow these steps carefully:
- Preparation:
- Power off the laptop, disconnect the AC adapter, and remove the battery (if removable).
- Press the power button for 5‑10 seconds to discharge residual power.
- Work on an anti‑static mat or grounded surface.
- Have thermal paste ready (you will need to reapply it).
- Take photos of the fan assembly and cable routing before you start.
- Remove the bottom cover (D Cover):
- Remove all visible screws – some may be hidden under rubber feet or labels.
- Gently pry the cover off using a plastic spudger – start from a corner.
- Locate the fan and disconnect the cable:
- Find the fan and locate its cable connector on the motherboard.
- Disconnect the cable by gently pulling the connector (not the wires).
- If the connector is locked, gently release the latch before pulling.
- Remove the fan/heatsink assembly:
- Unscrew the fan from the chassis (usually 2‑4 screws).
- If the fan is attached to a heatsink, unscrew the heatsink from the motherboard as well (follow the screw order printed on the heatsink).
- Carefully lift the assembly out – it may be stuck due to thermal paste; gently twist it to break the seal.
- Prepare the new fan:
- If this is a standalone fan only, transfer your existing heatsink to the new fan (if compatible).
- Remove any protective film from the new fan's base (if present).
- If the new fan comes with a heatsink, clean the CPU/GPU surfaces with isopropyl alcohol and a lint‑free cloth.
- Apply a pea‑sized amount of fresh thermal paste to the centre of the CPU/GPU die.
- Install the new fan:
- Place the fan/heatsink assembly onto the CPU/GPU – align the mounting holes.
- Secure the screws in a cross pattern (opposite corners) to ensure even pressure.
- Do not over‑tighten – snug is enough.
- If the fan attaches directly to the chassis, secure it with the mounting screws.
- Connect the cable:
- Plug the fan cable into the motherboard header – ensure it is fully seated.
- Route the cable neatly along the original path and secure with tape or clips if needed.
- Test before reassembly:
- Reconnect the battery briefly, power on the laptop, and enter the BIOS or use software like HWMonitor to check the fan RPM.
- Listen for any unusual noise – the fan should spin smoothly without grinding.
- Check CPU/GPU temperatures – they should be lower than before (or at least stable).
- Power off and disconnect the battery again.
- Reassemble: Replace the bottom cover and all screws.
Common mistakes to avoid:
- Forgetting to connect the fan cable before reassembly – you will need to disassemble again.
- Using too much thermal paste – this can cause overheating. Use a pea‑sized amount.
- Not following the correct screw order – some heatsinks require a specific sequence (printed on the heatsink) to avoid warping.
- Damaging the fan blades during handling – the blades are delicate.
If you are not comfortable with thermal paste application, we recommend professional installation.
What precautions should I take, and what if the fan does not spin or makes noise?
Critical precautions:
- Always disconnect the battery – the fan header can provide enough current to damage components if shorted.
- Handle the fan blades with care – the blades are thin and can break easily. Do not spin the fan manually with compressed air (can over‑rev and damage bearings).
- Use thermal paste correctly – only apply to the CPU/GPU die, not the motherboard. Avoid getting paste on fan blades or connectors.
- Check cable routing – the fan cable should not touch the fan blades or be pinched by the chassis.
- Ensure proper grounding – some fans have a grounding wire – connect it if present.
- Do not block the air vents – ensure the fan exhaust is not obstructed after reassembly.
Troubleshooting after installation:
- Fan does not spin at all:
- Check that the fan cable is fully seated on the motherboard header.
- Test the motherboard header with another fan (if available) to rule out a dead header.
- Verify the fan is receiving power – check the voltage with a multimeter (if you have one).
- Check BIOS settings – some laptops have a fan control setting that may be disabled.
- Fan spins but at low/irregular speed:
- Check the pin configuration – if you replaced a 4‑pin PWM fan with a 3‑pin fan, speed control will differ.
- Update the BIOS/EC firmware – sometimes the fan curve needs to be recalibrated.
- Check the operating system's power plan – a "Power Saver" plan may limit fan speed.
- Fan makes grinding or rattling noise:
- The fan may be misaligned – check mounting screws are not over‑tightened.
- A foreign object (e.g., cable, dust) may be touching the blades – inspect and clear debris.
- The bearing may be defective – if the noise persists, the fan may need to be replaced.
- Fan runs at full speed constantly:
- Check if the fan is 3‑pin and connected to a PWM‑only header – some motherboards only support PWM control for certain headers.
- The CPU/GPU may be overheating – check temperatures and ensure thermal paste is applied correctly.
- Reset the BIOS to default settings – sometimes fan curves get corrupted.
- Laptop still overheats after fan replacement:
- Verify that the heatsink is making proper contact – apply pressure evenly when tightening screws.
- Check that thermal paste is not too thick or too thin – reapply if necessary.
- Ensure air vents are not blocked by dust – clean them thoroughly.
- If the laptop is a gaming model, consider upgrading the thermal compound to a higher‑performance paste.
If the problem persists: The motherboard's fan controller may be faulty, or the new fan may be defective – contact our support with details and we will help diagnose.
How do I check fan RPM and what is a normal speed?
How to check fan RPM:
- In BIOS/UEFI: Most laptops show fan RPM in the hardware monitoring section (often under "PC Health" or "Hardware Monitor").
- Using software: Programs like HWMonitor, SpeedFan, or HWInfo64 can display fan speeds in the operating system.
- Listen for changes: The fan should speed up as CPU/GPU load increases and slow down when idle.
Normal RPM ranges (typical values):
- Idle (low load): 1500 – 2500 RPM (some ultra‑thin laptops are silent at idle).
- Medium load: 3000 – 4500 RPM.
- High load (gaming/video editing): 5000 – 7000+ RPM.
What if the RPM is out of range?
- Too low (below 1000 RPM at load): The fan may be underpowered, incorrectly connected, or the motherboard header is faulty.
- Too high (constantly at max RPM): The fan may be 3‑pin on a PWM header (runs at full speed) or the CPU/GPU is overheating.
- Fluctuating RPM (unstable): May indicate a loose connection, damaged cable, or failing fan bearing.
Important: RPM readings are approximate – different fan models have different speed ranges. The key is that the fan responds to load changes and keeps the system temperature under control.
If your new fan's RPM is significantly different from the original, check that the pin configuration (2/3/4‑pin) matches the motherboard header.